

Sunday, October 19, 2008
Much of these instructions have been adapted from BeJane and about.com, but I like my instructions better :) I used a simple shape, but if you have proper wood-cutting tools you could make a headboard in nearly any shape you like. There's instructions on the web, elsewhere for making a headboard that attaches to your bedframe. Despite having cement walls, I preferred my headboard to be mounted to the wall. It makes the building process much simpler.
Additional Readings/How-tos
- My Tufting Tutorial
- Diamond Tufting Technique on ApartmentTherapy <3 this
- Design*Sponge Upholstered Non-Rectangular-Headboard Video Tutorial
- French Tufting on ApartmentTherapy
- Mock-Tufting How-To on ApartmentTherapy
- Emboridery-Alternative to Tufting on Design*Sponge (I love this!)

Plywood cut to shape (MDF is also okay. Lowes cut my plywood to 24"X55" for a full-sized bed. It's best to have this cut 2" wider than your mattress/frame)
2" Foam cut to the size of the plywood (55"X24" which I bought at JoAnn's. Foam is really expensive, so you should wait until you have a coupon. Also, foam is not typically sold at widths more than 24".)
Batting, 10" longer and 10" wider than your foam (for me: 65"X34")
Ironed Muslin Lining Fabric, same size as batting
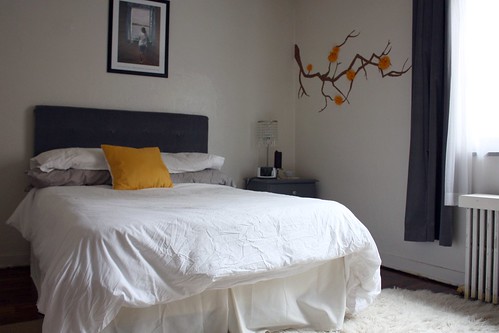
Ironed Decorative/Front Fabric, same size as batting (I used a spare, gray velvet "modern home velvet window panel" from Target.)
Sandpaper (I used a medium grit)
Drill with 1/2" bit
Staple Gun, staples
Flush Mounts or Other Hardware for Mounting Headboard to the Wall
For Tufting: Covered Buttons Backing Buttons Needle, Thread Needle Nose Pliers
Step 1: Sand Corners and Edges of Plywood
 The point of sanding is to prevent the wood from poking through the decorative fabric, plus it makes the board a little easier to handle
Step 2: Determine & Mark How Many Buttons/Tufts and Where
 I used pieces of paper to determine how many buttons/tufts I wanted in my headboard. Then I marked where I would have to drill.
 Step 3: Drill Pilot Holes and then 1/2" Holes
 After marking where you want your buttons, you should drill smaller pilot holes, and then use the 1/2" bit to drill the actual holes.
Step 4: Lay Down Muslin Lining, Center Batting on top of Muslin, and Center Foam on top of Batting
 Make sure you have ironed your muslin, as you don't want wrinkles in your headboard. There should be about 5" of batting and muslin on all sides of the foam.
 Step 5: Center Plywood on top of Foam
 Note that I added duct tape to prevent the plywood from cracking in half, this is not necessary.
 Step 6: Staple Muslin and Batting to Long-Sides of Plywood Board
 Starting with the center of a long side, fold the muslin and batting over the plywood, and staple gun it into place. Begin with three staples, each 2" apart. Then go to the opposite side, pull the muslin and batting fairly tight over the wood, and then secure the muslin and batting with 3 staples spread 2" apart on that long side. Keep doing this switching and stretching between long-sides, until the muslin and batting are secured, except for 7" or so on the ends.
 Step 7: Staple Muslin and Batting to Short-sides of Plywood
Now, pick a short-side, fold the muslin and batting over the plywood, and place three staples, 2" apart in the center of the short-side. You should leave 5" or so unattached on the edges. Switch to the other short-side and pull on the muslin and batting so no wrinkles appear on the "right side" of the headboard. Remember, if you make a mistake you can just pull the staples out and start again.
Step 8: Fold the Edges Like Gift Wrap


Step 9: Staple the Edges to the Plywood

Repeat Steps 8 & 9 Until All 4 Edges Are Secure

Step 10: Center Headboard Over Decorative Fabric and Secure with Staple Gun
 Basically, repeat what you did for the muslin and batting (Step 4, 6-9), but you do not need to staple as much. Instead of 2" between staples, 4" or 5" is okay.
Step 11: Add Buttons/Tufts
 To make these directions simpler, I placed the specific instructions for adding tufts and buttons to the upholstered headboard on another post, here. If you wanted to make the tufts "deeper" you could probably try extra layers of batting. The batting is soft enough that you could pull on it with the thread and buttons to a dramatic extent. (Or you could try the Diamond Tufting Technique like Target's Seville Headboard.
 Step 12: Mount Your Headboard to the Wall
 If you can't find flush mounts, Lowes (and probably Home Depot) offer a somewhat similar frame-hanging system that costs a little more. I bought two 7" sets which I attached to my headboard with wood screws and to the wall with concrete screws. We'll see how it works.
 Done!
Next up: How to Tuft an Upholstered Headboard


12 comments:
Wow, you have been busy. You are going to school out there right? Not just making stuff all the time? And I am very sad for you and your no crafters and hand sewing. :)
please help me find the detailed instructions for the tufting.
Hi Susan,
The link for the tufted headboard detailed instructions is missing, but here is the page: (http://byov.blogspot.com/2008/10/how-to-tuft-upholstered-headboard.html).
I'll be trying this, I hope you can too!
Monica
Ah! Sorry guys, you're right!! I've fixed the missing tufting link and added some useful additional resources at the top of the tutorial.
Good luck!
Hi, I was wondering where you got your fabric. It looks like a gray velvet on my screen which is exactly what I've been looking for. Any info would be great. Thanks!
Hey Kristen-
Thanks for the comment! I actually used a spare curtain panel (that matched my bedroom curtains) as fabric for the headboard.
I used the "modern home velvet window panel" from Target.com
It's nice to remember that you can repurpose curtains, tablecloths, tapestries, etc. for projects like these.
Good luck!
I used your post to create a headboard for my new master bedroom. It looks amazing. Thanks so much!
Thanks for sharing, Autumn! If you have any photos of the final product, it'd be awesome to see what others have done.
Hi! I am planning on creating a headboard for our bedroom (hopefully soon!). Thanks for the tips- the photos of each step were especially helpful (and the first I've seen when searching!) thanks
I'm glad you find them useful :)
I also put a collection of other useful links (with other photos) at the top of the post for some extra guidance.
Great tutorial. I have done this many times myself, but usually I already had a ugly wooden head board to just cover. I am trying to get the energy to make one with the legs that attach to the bed frame now. Keep putting it off, so now I am feeling encouraged to 'do' it finally. I need all the encouragement I can get lately.
Thanks!
Sheryll & Critters.
Thanks, Sheryll! It's been awhile since I made the headboard, but it's well worth the effort :)
Post a Comment