

Saturday, May 29, 2010
This is the silliest thing I have ever created. And that's saying a lot.
Remember when you were a kid, and you made a potato (or lemon) battery by hooking a potato up to a light with two pieces of wire? Well, this is a slightly more crafty version of the potato battery...but we're using conductive thread instead of wires, and a coin cell battery instead of a vegetable, and sewable LED lights instead of a light bulb!

Some friends and I are running a multi-session technology workshop for some local middle school girls from Gwen's Girls this summer. I needed to create a demo project to give the girls some ideas for their own project. If middle school girls can do it, there's a high chance that any craft person could, too!
What I did is very simple, and you can probably do it, too! (No electronics-knowledge required! Just sewing!)
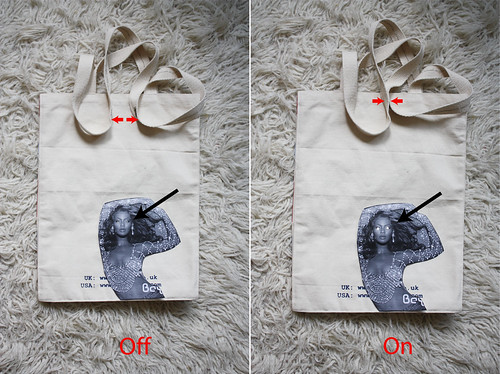
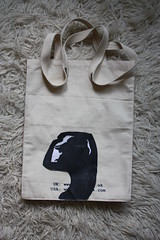
I made a tote bag with the image of Beyoncé on it. When the straps of the bag are connected (i.e., the bag is "closed"), then Beyoncé's eyes light up. Basically, it's a switch, and when the straps are connected it closes the circuit, supplying power to the LED lights. When the straps are not connected (i.e., the bag is "open"), then the lights are off.
Step 0: Materials
Note: The electronics we're working with are very low power. You will not shock yourself. It will all be okay :)
A Tote Bag or some other piece of fabric/clothing to sew electronics into
An image to act as the "body" for the LED light "eyes"
1 Sewing Needle (I use a smaller embroidery needle, since the conductive thread is thick, but the holes to sew the battery are relatively smaller. You may need to try a few different sizes of needles before you find one that works for both)
2 LilyPad LEDs
1 20mm Coin Cell Battery inside 1 Sewable Coin Cell Holder
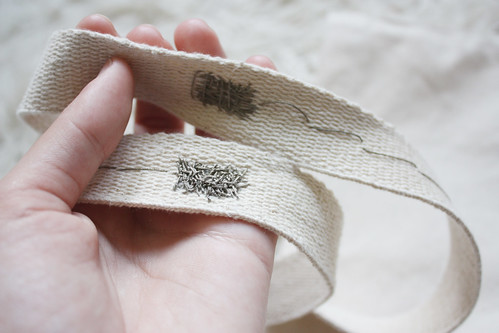
Some Conductive Thread
Total Electronics Cost: About $12, plus shipping & handling
(Alternatively, SparkFun sells a LilyPad E-sewing Kit for about $50, if you plan on doing more than just this one project)
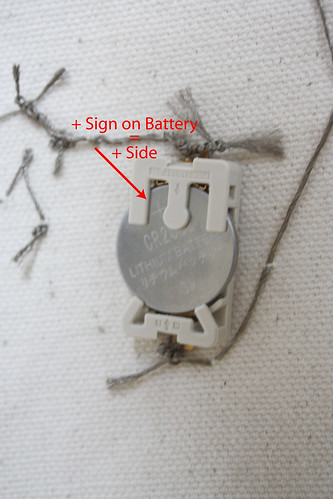
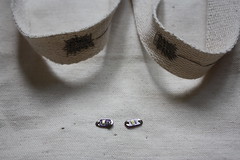
Step 1: Sew Positive Sides of Battery and LEDs together with Conductive Thread

The diagram above illustrates how you'll be attaching the parts involved, with conductive thread. The first step is to sew the plus-sides of the LEDs and the plus-side of the battery together (the green dashed line in the picture). Secure the end of the thread with some knots (as you would normal, sewing thread). The LEDs should be on the outside of the bag, and everything else should be on the inside. You should sew through the holes of the plus-sides a few times, securing the piece in place.
If at any time you run out of thread while sewing one of the three lines of thread, just cut another piece and make sure the new pieces touches (several times) the "old" piece. The electric current needs to be able to run through the entire line of thread.
Step 2: Sew Negative Sides of LEDs Together and Up Strap

Following the diagram above, use conductive thread to connect the minus-sides of the LEDs to each other. MAKE SURE TO NOT INTERSECT THE THREADS FROM THE PREVIOUS STEP WITH THIS LINE OF THREAD.
Using a running stitch (trying to make the thread not appear on the right-side of the bag), sew up to the top/middle of strap #1. Once you get to the top of the strap, using satin stitch sew a rectangle with the conductive thread. Secure the end of the thread with some knots (as you would normal, sewing thread).
Step 3: Sew Negative Side of Battery Up Strap #2

Following the diagram above, sew a few stitches through the minus-side of the battery to secure it in place (using conductive thread). This is denoted by the orange dashed line in the figure. MAKE SURE TO NOT INTERSECT THE THREADS FROM THE PREVIOUS STEPS WITH THIS LINE OF THREAD.
Then, using a running stitch, sew to the top of the second strap (you probably need to go under the bottom of the bag and up the other side). As before, use a satin stitch to sew a rectangle with the conductive thread. Make sure the two rectangular conductive embroidery patches will connect when you put them together.

Step 4: Test the Bag by Pressing Straps Together

When you press the two satin-stitched thread patches to each other, the LEDs on the outside of the bag should light up. If not (or if it lights up all the time) you either (1) connected something wrong or (2) some of the threads that should not be touching are touching. Make sure the three different pieces of thread (denoted by different colors in the diagram) do not touch each other, except at the straps!

Step 5: (Optional)Attach Image Over LEDs
I chose to attach an image over my LEDs, to "pretty them up" and give them a purpose as eyeballs. This might make a good Halloween project...
Step 6: You're Done!
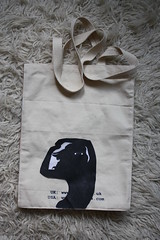
Your bag should now be functional!
Think of what you could do with a buzzer or a tri-color LED instead of just single-color LEDs! If you want to get more advanced, you're going to want to check out the rest of the LilyPad Series including the arduino, and different sensors (light sensor, microphone, temperature, etc.). These more advanced projects will require some programming ability...


2 comments:
This is so neat and just put all of my DIY projects to shame lol.
http://jammer10am.blogspot.com/
Haha, thanks, I sorta just learned to do it all and was surprised by how simple it actually is.
There's nothing like a project that takes little time to assemble, but has maximum wow factor :)
Post a Comment