

Wednesday, May 2, 2012
I took a break from quilt-sewing to do some more, uh, quilt-sewing. More on that in an upcoming post. Anyways, producing half square triangles is a rather basic quilting concept with a traditional method for making them, which this is not a tutorial for. I've based the technique off of Rhonda's, and it seems to work well despite being a bit unconventional (Rhonda also has another way of making HSTs, which is also interesting). You might encounter some problems related to [fabric] bias...and then again, you might not.
If you're a quilting traditionalist, close your eyes. Everyone else, hold onto your hats, this quilting expedition's about to get wild.
Unorthodox Production of Half Square Triangles (HSTs) Square Tutorial
All sarcasm aside, this is a rather handy technique to keep in your toolbox.
Notes
- All seams are 1/4".
- Iron each seam open.
- Measure/trim to make sure the HSTs are the same size.
- If the fabric is sliding as you sew, use pins or baste.
Materials
1x strip of fabric color A, 1/2" X 9 1/2" (to make 9x 1 1/4" HSTs, scale up for larger)
1x strip of fabric color B, 1/2" X 9 1/2" (to make 9x 1 1/4" HSTs, scale up for larger)
Square Template (I cut a 1 1/4" cardboard square, so I wouldn't have to purchase anything)
Rotary cutter, Mat, Ruler, Thread, Sewing Machine, etc.
Step 1: Sew together your two strips, along the long side
Sew together the two strips of fabric and press the seams open.

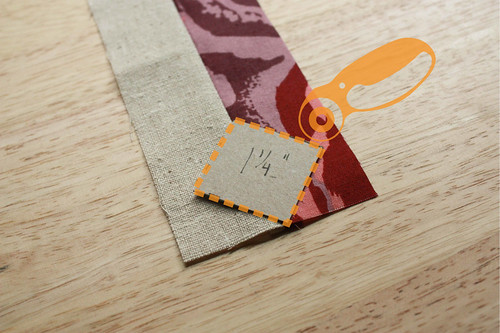
Step 2: Right sides up, place template diagonally on seams
With the right sides of the sewn strips facing upwards, place the square template so that opposite corners each touch the seam. Better placement translates to better HST Squares.

Step 3: Using the rotary cutter, cut each side of the square
Holding the square template in place, use your rotary cutter to cut first one side of the square, move the fabric (or mat), then cut another side, and continue until all sides have been cut and you can remove the HST Square.
Step 4: Place template diagonally as before, with one corner touching the previous cut seam
Place the template further up along the seam, so that one corner is touching the recently cut seam, and the other corner is touching further up on the seam.

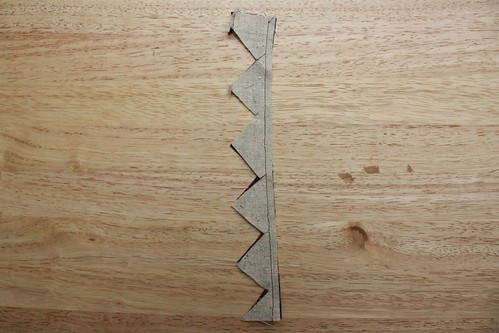
Step 5: Repeat Step 4 until you run out of fabric
Continue repeating Step 4 until you can no longer cut out HST Squares. You now have two "bunting" pieces with connected triangles.

Step 6: Line up bunting pieces, right sides together
Line up the bunting pieces with the right sides facing each other, pin the straight edge (optional) in preparation for sewing.

Step 7: Sew along straight edge of bunting pieces, iron seam
Sew along the straight edge of the two bunting pieces, and then iron the seams open so you have a flat surface again.

Step 8: Repeat Steps 4 & 5 on the connected bunting pieces
Keep cutting out HSTs until you run out of fabric, again.

Step 9: Iron the HST Squares and measure/trim to the same size
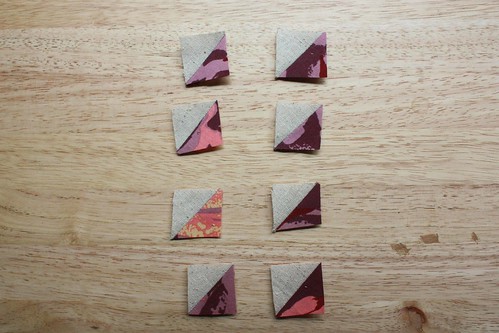
Once you've run out of fabric to cut, you can iron the HST Squares' seams open, and then measure and trim them all to the same size. Done!


4 comments:
I am in awe over how crafty you are.
You are my kind of quilter! I can't do the perfection bit when it comes to sewing...loving your diagrams and such. :)
Amazing tutorial! Thanks for all the effort that went into this post!
Good idea, however, to take it to the next level.. Take your two strips and sew them together on both sides of width of fabric. Then cut out triangles, alternating side to side. All that is left to do is press and square up.
Post a Comment