

Wednesday, April 12, 2017
Back in 2010 I had a volunteering project that required making an eTextiles project using a simple switch circuit. So, I made a Beyonce Tote Bag whose eyes lit up when the straps were placed together. As one does. Naturally.
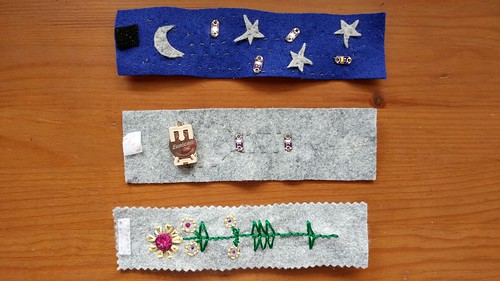
As part of my upcoming gig, I may be bringing back this eTextiles work as part of a one-month course. In preparation of that, I've created a two-hour introductory workshop on circuits with eTextiles for 7-9th graders. I classified it as an Arts & Humanities workshop, and focus on making a light-up felt wristband. The project doesn't have to be a felt wristband, but sewing Velcro squares to felt seems like a good introduction to sewing (i.e., knotting the thread, threading the needle, and the running stitch). But yes, the project could instead be a light-up sweatshirt, or Teddy Bear, or Belt, or Beyonce Tote Bag.
There's also a variety of circuits that one can implement on this felt wristband. A simple circuit with one light? A parallel circuit with two lights! A more complex circuit involving a Lilypad computer chip and multiple lights that twinkle off and on! I am going to go over all three of these and the quantity of supplies needed for one project, and for a class of 10.
But first, we start with some basics!
I purchase all of my sewable electronics components from SparkFun.com, and I've included the part numbers throughout the supplies graphics.
The typical crafty stuff such as felt, sewing thread, scissors, embroidery floss, can come from your local fabric/sewing store.
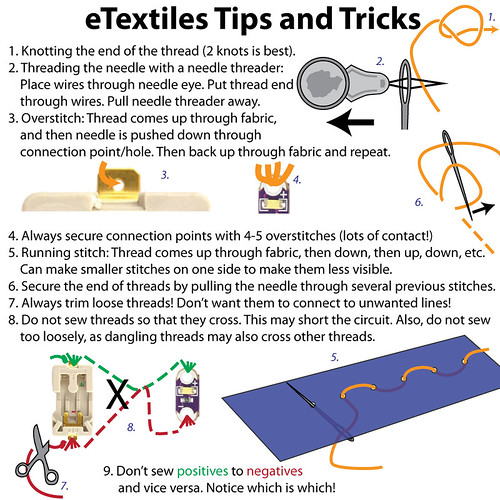
Skill: knot the end of a thread
I tend to use two tailor's/pretzel knots stacked right on top of each other, but you can also do a Quilter's knot. Whichever you think students will grasp a hold onto easier.
Skill: thread a needle
I usually just shove the thread through the needle-eye by hand, with a bit of saliva and hand-eye coordination. But for those lacking that technique, using a needle threader may be a good approach. Just shove the threader's wires through the needle-eye, put the thread through the wires, then pull the threader away from the needle. The thread should go with it and your needle should be threaded.
Skill: Overcast stitch for securing components
The overcast stitch is handy for sewing Lilypad components to a piece of fabric. This is a good photo tutorial: https://www.craftsy.com/blog/2014/11/overcast-stitch-by-hand/. I like to push my needle up through the fabric, just outside of the component's connecting point/hole, and then push my needle down through the metal hole. Then push the needle back up through the fabric, just outside of the component's connecting point/hole.
Tip: Always secure connection points with 4-5 stitches.
When using connecting two electronic components with conductive thread, it's smart to use several stitches around the connecting point to ensure lots of contact between the metals.
Skill: Running stitch for connecting several components
A running or straight stitch can be used to connect the connecting points of several electronic components. It's the basic process where the thread comes up through fabric, then down, then up, down, etc. ApartmentTherapy has a tutorial on this stitch and others, here: http://www.apartmenttherapy.com/how-to-sew-basic-stitches-221433. I sometimes like to make smaller stitched on one side of the fabric, so they aren't quite as visible. If I don't care about looks, I'll often pick up several stitches at once to save the time of individually creating each stitch.
Tip: Ends of Thread Must Be Secured
I usually secure the end of threads by pulling the needle through several previous stitches, or sometimes backstitching. This is necessary to prevent all your work from unraveling! this tutorial describes some options.
Tip: Always trim loose thread ends
Keep your thread ends short. You don't want an electrically conductive thread to touch other electrically conductive thread (when a battery is involved), as it will do weird things to your circuit and/or short the circuit and make it not work.
Tip: Do not sew threads so that they cross.
Crossing threads when sewing may short the circuit. Also, do not sew too loosely, as dangling threads may also cross other threads (similar to long thread ends). Make sure that when your project is being worn, different lines of threads don't touch each other, either. If you're afraid of threads touching/crossing during wear, it's possible to insulate the threads with hot glue, or by stitching fabric over top of the conductive threads (using non-conductive thread).
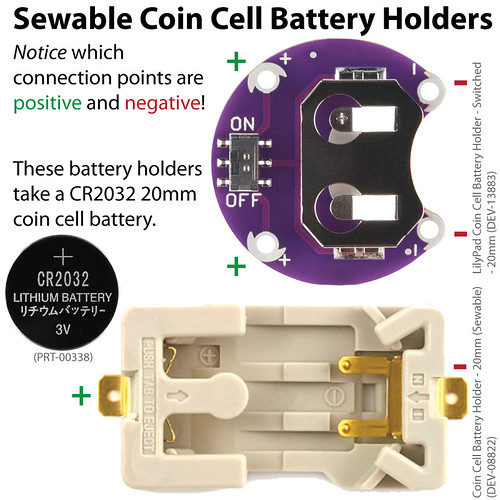
Tip: Don’t sew positives to negatives and vice versa. Notice which is which!
The circuit only works if negatives are connected to negative sources, and the same for positives. This sort of forces the circuitous nature of the circuit ;)
Skill: Troubleshooting
If your completed project doesn't work, try testing it with Alligator Clips. If you don't have those, make sure that (1) your battery works, (2) you aren't criss-crossing any conductive threads unintentionally, (3) you've connected only positive points to positive and negative points to negative, (4) make sure your battery is in the correct way, (5) ensure you used conductive thread, (6) check that the connection points have lots of conductive thread going through them, (7) if all else fails, maybe the LED/chip/sensor is dead?


0 comments:
Post a Comment