

Sunday, July 17, 2011

You've seen my traced photos around the blog, and I've fielded a handful of requests over the years about how I make them (especially my illustrations of people). The answer? I cheat. Sort of. I trace images using Adobe Illustrator. When I first started, I began with a copy of Adobe Illustrator 10, and six hours to complete one face illustration! With lots of practice, nowadays it only takes 1.
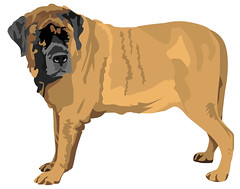
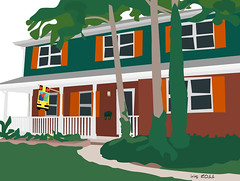
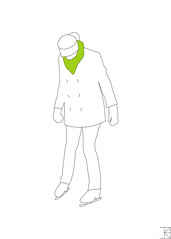
You could try the instructions from which I learned, but below I'm sharing a tutorial for tracing something simpler: objects, or more specifically, an apple. If you can trace/draw an apple, you can apply those same techniques to other objects, such as the mastiff above. I'm still using my ancient copy of Adobe Illustrator 10, but any sort of vector graphics drawing program should work (i.e., a raster graphics program like Photoshop, The GIMP, or Microsoft Paint may not work).
Tutorial for Tracing Photos of Objects with Adobe Illustrator
Step 1: Open up Adobe Illustrator and create a new document (Ctrl+N) approximately 15x15 inchesStep 2: Assure you have the following 'Windows' open: Color, Layers, Swatches, Tools, and Transparency
On the menu bar, make sure you have these handy 'Windows' open: Color, Layers, Swatches, Tools, and Transparency. As you do more intricate work, you may need other windows like Stroke, Appearance, Transform, and Align.

Step 3: Select an image to trace
In this case, I simply used Google Image Search to find an 'apple', and here's what I ended up with:

Step 4: Copy/Paste image to Illustrator document
Copy and paste the image to the Illustrator document you created previously.
Step 5: Lock the image layer
In the 'Layers' toolbox, click the empty checkbox to the right of the eye-icon. A lock should appear. This means that the photo layer has been locked in place, and will not move until you unlock it.

Step 6: Create a new layer on top
Again, in the 'Layers' window, create a new, blank layer. You should click the little page-icon on the bottom of the Layers window. This is the layer you will draw on.

Step 7: Identify key parts of the image
Now, look at your image and determine where the key color segments are. In this photo of the apple, there is the outline of the apple, the green near the stem, several shine spots, and the stem itself.
Step 8: Select the pen tool
You will be using the pen tool for tracing, and this is what makes a vectorized image, which allows you to increase the size of your drawings without any loss of quality. The pen tool is tricky and takes a lot of practice. The technique: click-and-drag a starting point and angle, then click-and-drag another starting point and angle, and continue until you end at your first point. You can always adjust the point's placement and angle using the 'Direct Selection Tool' (the white arrow on the 'Tools' window) afterwards.


Step 9: Using the pen tool, trace the key parts of the image
It is important to think about each shape you draw as a layer of paint. The first shape you outline should be the "back-most" shape, as the next shapes you draw will be on top of that one. You can fix any sort of ordering mess up later, by selecting the shape, right-clicking the shape, and choosing Arrange>Bring Forward or Arrange>Send Backward. For the apple, first I outlined the outside, then the largest pale red areas, then the smaller, then the green areas, and then the stem.
This is what the image should look [somewhat] like, after tracing all the areas. Stroke and fill color can be adjusted with the 'Color' window. Stroke-width can be adjusted via the 'Stroke' window.

Step 10: Choose fill colors for the traced shapes
Now that you've finished tracing the areas of the apple, start adjusting the fill-color of each shape with the 'Color' window. Make the stroke transparent (white box with a red slash). Start with the top-most shapes and work your way backwards, so you can see what you're doing.

For the whiter, shiny areas, you can make them semi-transparent through the 'Transparency' window.
Step 11: Hide the photo layer
In the beginning of this tutorial we created a new layer on top of the photo, and we drew on that layer. The reason we did that, is so we can make the photo disappear. Simply click the eye-icon on the 'Layers' window, next to the photo layer (i.e., next to the lock-icon.

Step 12: 'Save for Web' your image as a .png or .gif with transparency enabled

Done!
While my apple looks a little bit like a tomato, I used these exact techniques to create all four of the images at the top of this blog post. Tracing faces uses a very similar technique, but there's a lot of tricks to be learned, that I did not cover here.
Note: I am not responsible for any sort of copyright infringement problem you may get yourself involved in, by tracing other people's protected images. Trace with care :)


3 comments:
Fun! I wish I had Adobe Photoshop. Lucky!
Great tutorial! I use GIMP, but could totally see how to do this myself. I've been curious since I started reading your blog. :)
Very good explanation!! I do something similar to this, but not those exact steps, so can't wait to try this!
Post a Comment