Saturday, March 20, 2010
I have a circus party to attend, dressed as a tightrope walker. Maybe you have a better excuse to be wearing a tutu?

Other name possibilities: How-to Tutu, Tutu Tutorial, ...
This is a very simple no-sew tutu (if you don't use a ribbon waistband, but even the ribbon is pretty simple).
The yarn method described here allows better/easier customization of the tutu (better than the other methods which have you tying the tulle to a piece of ribbon, rather than the other way around). It's easier to make it thicker, poofier, etc. You can even incorporate other colors and materials like ribbon or sequins. Or consider cutting pointed ends onto the strips of tulle for different effects.
For this tutu I used approximately 8 yards of 17"-23" strips of nylon tulle, but I'm 5'11", so you may need to adjust length to be appropriate for your body type. Length can be adjusted when you're done, but it's much easier (and cost-effective) to figure out what you want in the beginning.
I stole this method from khayotikk on Youtube, but I find it unbearable to sit through a video, especially when she's just using photos with audio anyways.
Step 0: Materials

~8 yards of nylon tulle (for a 29" waist/38" hips on a 5'11" woman)
Scissors
Yarn/Cord (Enough so you can wrap it around your waist ~5 times)
[Optional] 2 yards Ribbon, Needle, Thread
Step 1: Fold Yarn in Half and Tie to Something Solid

Fold the yarn in half, and tie the fold to something solid (like a chair or table).
If you're not going to sew a ribbon onto the tutu, you should leave yourself lots of extra string in the knot so you have something to tie the tutu together.
Step 2: Cut Strips of Tulle
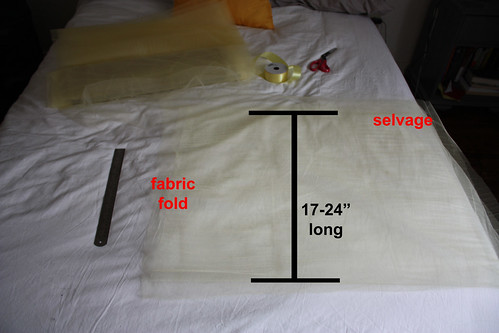
I cut 17"-20" strips of tulle, perpendicular to the selvege, as shown above. I also cut the strips in half, at the fabric fold (this gives you single strips instead of double strips).
For a fully-grown woman, I recommend no shorter than 10" strips.
Step 3: Roll Nylon Along Desired Length and Cut 3" Pieces

Roll the tulle the desired length (in our case, it was the 17"). Then, cut the tulle roll every 3" to give you strips of tulle that are 17" long.
Step 4: Make a REALLY Loose Knot in the Yarn

Make a really loose knot with the yarn. Do not tighten the knot. Do not make a double knot to tighten the knot.
Do a single knot that you can fit a few fingers into (you'll eventually be putting the tulle-twist into that loose knot and *then* tightening).
Step 5: Take One Tulle Strip/Piece

For most of this tutu, I used a single piece of tulle, but you can double the tulle if you have enough and want something poofier than what I had.
You may also want to consider using different colors of tulle, or wrapping a thin piece of one color in a wider piece of another color. You could even incorporate strands of yarn, sequins, ribbons, etc. into this.
Step 6: Twist the Top Half-Inch of Tulle

As shown in the photo, twist the top half-inch of a tulle strip, so you have a small little twist above your fingertips.
Step 7: Stick the Tulle-Twist into the Loose Knot

With the tightest point of the tulle-twist, place it into the loose knot/circle we made with the yarn a few steps ago.
Step 8: Secure the Tulle in the Yarn by Tightening the Single Knot

Secure the tulle-twist into the knot by pulling on both ends of the yarn and tightening the single knot.
Step 9: Knot Again, Making a Double Knot
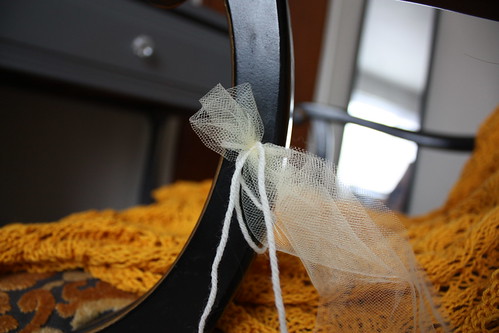
With the two yarn strands, make another knot and tighten, securing the tulle in place.
Step 10: Repeat Steps 2-9 Until Tutu is Wide/Long Enough

Repeat steps 2-9, as necessary (only cutting new strips of tulle when you run out). It's essentially a process of:
1) Loosely single-knot yarn
2) Twist tulle strip
3) Place tulle twist into single knot
4) Tighten knot, then double knot
Repeat
As you add more strips and knots, the tutu will start to take shape. This photo is a close-up of the knots.
Step 11: [Halfway] Done!
![Step 11: [Halfway] Done!](http://farm5.static.flickr.com/4043/4448547286_57344758ce.jpg)
Keep cutting strips, knotting, twisting, and securing until the tutu is the right length/width. If you are doing a no-sew version, you're done! You can just use the leftover yarn to secure the tutu around your waist. However, it's not much more effort to attach a ribbon...
[Optional] Step 12: Sew Ribbon Through Yarn Knots
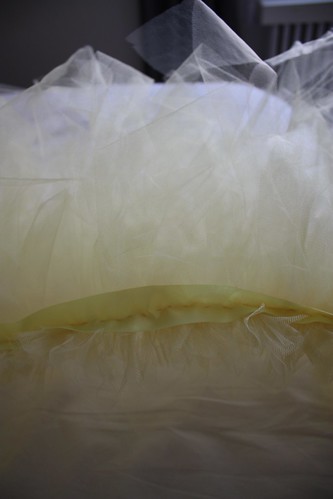
Using a needle and thread, attach the ribbon to the knots at the top of the tutu, using a simple running stitch or whatever you may prefer.
Be sure to leave leftover ribbon on either side of the tutu, so you may tie the tutu to the waist.

Step 13: Done!



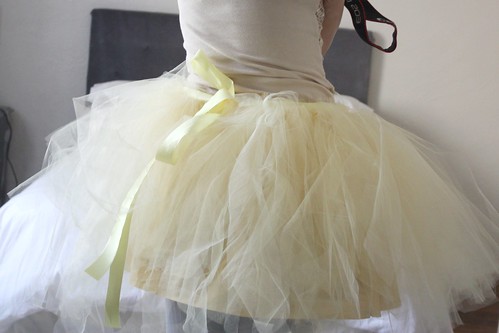
If you're a little self-conscious about having your rear exposed where you tie the tutu (as I am), you may want to wear thicker tights, or create an underskirt. I made a 5-minute Simple Elastic-Waist Skirt Tutorial described here to go under my tutu.


0 comments:
Post a Comment