Showing posts with label cooking. Show all posts

Recipe: Rose Essence Meringues

Sunday, July 13, 2025

Rose Meringues Rose Meringues

Who knew just blobbing partially mixed meringue batter could make such pretty little cookies?
I had 4 egg whites leftover from a big batch of canneles de bourdeaux and ended up with these colorful little dollops. Recipe is adapted slightly from lepetiteats.

Recipe

Ingredients

  • 4 large egg whites
  • 0.5 tsp cream of tartar
  • 3/4 cup caster sugar
  • 1 tsp rose essence
  • 1 drop pink food coloring (optional)

Instructions

  1. Preheat the oven to 200 degrees Fahrenheit (95 Celsius).
  2. Whisk the egg whites and cream of tartar on high speed with an electric mixer until stiff peaks form.
  3. Gradually add the sugar, while continuing to whisk. The mixture should be very stiff and glossy.
  4. Add the rose essence and food coloring to a small bowl, and fold in a cup of the meringue.
  5. Transfer the mixture back into the meringue, and fold gently to combine until color is evenly distributed.
  6. Blob tablespoonfuls onto parchment lined baking sheets, and bake for 1.5 hours or until the meringues are very dry and peel off the parchment easily.

Rose Meringues

Semi-Success: Madeleines

Sunday, July 6, 2025

Madeleines Madeleines

These madeleins from Sally's Baking Addiction didn't come out quite right. Not quite as lofty as expected. And while I did get the signature ridges, the underside of the cookie was way lumpier than it should have been. I suspect the batter is somehow more solid than it should have been.Tasted fine, though!

Madeleines Madeleines

Success: Chocolate Almond Pear Tart

Sunday, June 29, 2025

Chocolate Almond Pear Tart Chocolate Almond Pear Tart

This chocolate almond pear tart from Marcellina in Cucina is not quite the chocolate-pear tart of my dreams. I'm picking up the hunt again. It's quite tasty when heated up, but I think I'm expecting a more ganache-y filling?

Chocolate Almond Pear Tart

Recipe: Browned Butter Gateau Magique

Sunday, June 22, 2025

Browned Butter Gateau Magique Browned Butter Gateau Magique

I had been thinking of this cake for weeks. And so, I made it! It's the ingredients from milk street which is rather similar to this recipe from Simmer and Sauce, but you replace the unsalted butter with browned salted butter, and the white sugar with light brown sugar.

It's a crowd pleser, because you take rather unappetizing batter, pour it into a pan, and the cake separates itself out into three layers, magically. Very custard-y little cake.

Browned Butter Gateau Magique Browned Butter Gateau Magique

Browned Butter Gateau Magique

Ingredients

  • 8 Tbsp salted butter, browned
  • 4 eggs, separated
  • 3/4 cup light brown sugar
  • 1 tsp vanilla extract
  • 3/4 cup all-purpose flour
  • 2 cups milk
  • Confectioners' sugar, for dusting (optional)
  • Fresh whipped cream, for serving (optional)
  • Sliced strawberries, for serving (optional)

Instructions

  1. Preheat oven to 325 degrees Fahrenheit (160 Celsius) and line an 8" x 8" cake pan with parchment paper.
  2. Brown the butter in a small saucepan, set aside to cool a bit
  3. In the bowl of a kitchen mixer add the egg yolks and sugar, and beat on high until the mixture turns pale yellow (~1 minute).
  4. Add the vanilla extract and browned butter and beat until the ingredients are well incorporated. Add flour and beat mixture until just combined.
  5. With the mixer on low, slowly add the milk 0.25c at a time. Pour the mixture into a large mixing bowl and set aside.
  6. Clean the mixing bowl and add the egg whites. Whisk the egg whites on high until stiff peaks form.
  7. Using a silicone cake spatula, gently fold the egg whites into the batter, one-third at a time, until just incorporated. Do not overmix and deflate the egg whites. The batter will be thin but lumpy. Pour the batter into the prepared cake pan.
  8. Place the cake in the oven and bake until the top is golden brown and the cake does not wiggle when you gently shake the pan, about 35-40 minutes.
  9. Remove the cake from the oven and cool. Once cool, remove the cake from the pan and dust the top with confectioners' sugar (optional).
  10. To serve, slice the cake and top it with whipped cream and fresh fruit, if desired.

Browned Butter Gateau Magique

Recipe: Cannelés Bourdelais [omg]

Sunday, June 1, 2025

Making Canneles de Bordeaux: Attempt 2 Making Canneles de Bordeaux

I got a wild hare to make Cannelés de Bordeaux, a sort of fiddly French pastry. I used the recipe from Eat Live Travel Write as she did some extensive testing with molds, preparations, recipes, etc. The first batch (shown in the bottom row below) was a pretty good success, despite accidentally forgetting to turn the temperature down to 400-degrees! The second batch (shown above) was more brown, less black. There should be a bit of black - but I think I might like even less. And batches 3-6 (shown in the first row below) turned out the best. I've put in my minor adjustments into the recipe below.

Tasty, crunchy exteriors and soft custardy interiors. What's not to love?!

Cannelés de Bordeaux

Makes 16 cannelés

Ingredients

  • 2c (500 ml) milk
  • 2Tsbp (27 g/ 1/4 stick) unsalted butter
  • 1c (200g) sugar
  • 1c (150g) flour
  • 2 eggs
  • 2 egg yolks
  • 1/4 c (60ml) dark rum (or rhum
  • 3tsp pure vanilla extract
  • Melted unsalted butter, small amount for the mold

Directions (day before)

  1. Bring milk and butter to a boil in a saucepan. Remove from the heat and cool slightly, stirring occasionally to reduce some heat.
  2. Whisk sugar, flour, eggs and egg yolks in a small bowl until a soft paste-like consistency.
  3. Pour in the milk mixture whisking gently until you have a smooth liquid.
  4. Add the vanilla and rum and give it one last stir (don't whisk air into the batter).
  5. Using a wire strainer, strain the batter over a glass container (preferably something pour-able), cover with plastic wrap, and refrigerate 12-24 hours.

Directions (ready to bake)

  1. Preheat oven to 450˚F (230˚C).
  2. Brush silicone molds with a little melted butter. Coat the molds sparingly and turn the molds upside down over a paper towel to drain excess butter from inside. Set aside (at room temperature).
  3. Remove batter from fridge, give it a stir and set aside.
  4. When the oven reaches temperature, stir batter one final time and pour into the molds at about 3/4 full.
  5. Place the silicone molds on thin baking tray and bake at 450˚F (230˚C) for 30 minutes.
  6. Reduce heat to 400˚F (200˚C), cover with foil, and bake for 30 more minutes.
  7. After 30 minutes, remove tray from oven. Carefully flip the cannelés out of the molds onto a cool, thin baking tray so they are right side up. They should slide right out of the molds.
  8. Bake for 5-9 more minutes, depending on your preferred darkness.
  9. Remove tray from oven, place on a wire cooling rack until reaching room temperature.
  10. Best eaten the day they are made (after about 2 hours at room temperature). They can be kept in an airtight container overnight but they lose some of their crunchy exterior.

More Canneles Bourdelais More Canneles Bourdelais
Making Canneles de Bordeaux Making Canneles de Bordeaux

Recipe: Lemon Lavender Pound Cake

Sunday, April 20, 2025

Lemon Lavender Pound Cake

I've made this lemon lavender pound cake from Desserts for Breakfast for many, many years. It's a lovely, surprising little treat for when you want to make something a little special. So, I'm gonna stash the recipe here!

Lemon Lavender Pound Cake

Make two cakes!

Ingredients

  • 1/3 c milk
  • 6 eggs
  • 1 1/2 Tbsp lemon juice
  • 1 Tbsp vanilla extract
  • 3 c flour
  • 1 1/2 c sugar
  • 1 1/2 tsp baking powder
  • 1/2 tsp salt
  • 2 Tbsp grated lemon zest
  • 1 2/3 c butter, softened (I ALWAYS over melt this, and it's _okay_)
  • 1/3 cup dried lavender flowers
For the glaze (do not skip!)
  • 1/2 c powdered sugar
  • juice of 1 lemon (~3 Tbsp)
  • zest of 1 lemon
  • Optional: sliced almonds

Directions

  1. Preheat oven to 350 degrees F (175 C). Grease and flour two loaf pans.
  2. In a bowl, combine milk, eggs, lemon juice, and vanilla. Whisk until combined.
  3. In the bowl of a mixer, combine flour, sugar, baking powder, salt, and lemon zest. Mix to combine.
  4. Add the butter to the flour mixture. Cream for 2-3 minutes until fluffy.
  5. Gradually add the milk mixture in 2-3 parts, mixing for about 30 seconds to 1 minute before each addition.
  6. Mix in lavender flowers until evenly distributed through the batter. Be careful not to overmix.
  7. Divide the batter into the two loaf pans.
  8. Bake for ~30-35 minutes. When the tops are about to crack, score the tops in one line with a sharp, oiled knife to create an even crack. Then, place an oiled piece of foil on top of the cakes, oil side down. Continue to bake for 25-30 minutes (for a total baking time of ~55-60 minutes).
  9. The cakes are done when a toothpick removed from the center of the cake comes out clean. Remove from oven and let cool for 10 minutes on a rack before turning the cakes out. Let cool completely.
For the glaze (do not skip!)
  1. Mix together powdered sugar and lemon juice.
  2. Add in the lemon zest. Mix until combined.
  3. Pour the glaze over the pound cakes.
  4. Immediately top with a sprinkling of sliced almonds, if using. Let harden.

Lemon Lavender Pound Cake

Recipe: Roasted Green Vegetable Soup [omg]

Sunday, April 6, 2025

Roasted Green Vegetable Soup Roasted Green Vegetable Soup

I make this soup on repeat in the winter. It's like a winter salad...don't skimp on the lemon juice. It's basically roasted garlic, broccoli, and lemon juice flavored! Great with a slice of sourdough bread.

Roasted Green Vegetable Soup

Ingredients

  • 3 Tbsp olive oil
  • 1 leek/onion/shallot, diced
  • 1 head garlic, top lopped
  • 1 broccoli, chopped
  • 1 zucchini, sliced
  • sprinkling of spices/za'atar
  • 1x 32oz box chicken stock
  • 15oz can butter beans (or cannelini beans)
  • 1c frozen peas
  • 2 handfuls spinach
  • juice of 1/2 a lemon

Directions

  1. Roast for 25 minutes at 400 deg: olive oil, leek/onion/shallo, garlic, broccoli, zucchini, spices/za'atar
  2. Boil for 5-7 mins: chicken stock, beans, peas
  3. Add roasted vegetables, spinach, and juice of 1/2 a lemon
  4. Blend until smooth
Roasted Green Vegetable Soup Roasted Green Vegetable Soup

Fail: Zucchini Ricotta Quiche

Sunday, March 23, 2025

Quiches Quiches

Maybe this Zucchini-Ricotta Quiche from Sweet Peas and Saffron isn't meant to be frozen and thawed, because it had some serious soggy bottoms! The other quiches I made for my quiche party came out well, but I've posted about them before on the blog: spinach sheet pan quiche, bacon tart, and a sausage veggie breakfast quiche from AllTheHealthyThings.

Recipe: Chocolate Zucchini Bread [omg]

Sunday, June 23, 2024

Cocolate Zucchini Bread

When you grow 1-2 zucchini plants, then you end up with lots of zucchini bread. This chocolate zucchini bread from Sally's Baking Addiction has been an absolute staple. I usually make a double batch, and freeze one of the loaves. It thaws well. Very very good. Have made it at least 9 times now.

Cocolate Zucchini Bread Cocolate Zucchini Bread

Chocolate Zucchini Bread


Ingredients

  • 1c (125g) flour
  • 1/2 c (41g) unsweetened cocoa powder
  • 3/4 tsp baking soda
  • 1/4 tsp baking powder
  • 1/4 tsp salt
  • 1/2 tsp espresso/coffee powder (optional)
  • 3/4 c (135g) semi-sweet chocolate chips
  • 2 eggs
  • 1/4 c (60ml) vegetable oil
  • 1/3 c (80g) plain Greek yogurt
  • 2/3 c (135g) granulated sugar
  • 1 tsp vanilla extract
  • 1 and 1/2 cups (180g) shredded zucchini (no need to blot, unless frozen)

Directions


  1. Preheat oven to 350°F (177°C). Grease a 9×5-inch loaf pan.
  2. In a large bowl, whisk flour, cocoa powder, baking soda, baking powder, salt, and espresso until combined. Mix in the chocolate chips. Set aside.
  3. In a medium bowl, whisk the eggs, oil, yogurt, granulated sugar, and vanilla together. Slowly pour wet ingredients into dry ingredients and whisk to combine. Fold in the zucchini. The batter should be very thick.
  4. Bake for 45–50 minutes, loosely covering with aluminum foil halfway through to prevent the top from over-cooking. The bread is done when a toothpick inserted in the center comes out clean with only a few small moist crumbs (although, having chocolate chips might streak chocolate on the toothpick!). All ovens vary, so begin checking around the 45-minute mark.
  5. Remove bread from the oven and allow to cool in the pan on a wire rack for 1 hour. While it’s still warm, press a few more chocolate chips into the top; this is optional and only for looks.
  6. Remove bread from the pan and place the loaf directly on a wire rack to cool completely.
  7. Cover and store at room temperature for up to 5 days or in the refrigerator for up to 1 week.

Cocolate Zucchini Bread

Success: Chocolate Peanut Butter Cake [omg]

Sunday, March 3, 2024

It's not the most beautiful cake, due to less-than-viscous-enough chocolate ganache, but it is absolutely delicious.

Chocolate Peanut Butter Cake

This is SmittenKitchen's Peanut Butter Cake. It is very effortful (lots of refridgerating cycles) and very intense. We ended up getting 16 slices out of it, most of which are in the freezer. Individual slices thaw *beautifully*.

'Would make again, if I want to spend 4 hours on a delicious cake with weeks of cake leftovers!

Chocolate Peanut Butter Cake

Success: Strawberry Bread Pudding

Sunday, July 9, 2023

Smitten Kitchen Bread Pudding Smitten Kitchen Bread Pudding

Despite the previous two batches of strawberry rhubarb crumble, there was still many strawberries left in the freezer. I got really carried away during berry picking last summer! This time I threw them into SmittenKitchen's blueberry bread and butter pudding, swapping out the berries and using better bread than what was called for. Came out quite pleasant...but could probably use more berries next time!

Smitten Kitchen Bread Pudding

Success: Strawberry-Rhubarb Crumble

Sunday, June 18, 2023

life-rhubStrawbCrumble-2

Encountered some rhubarb at the local farm store, and decided to use up an over-obundance of flash-frozen hulled strawberris picked last summer in Smittne Kitchen's Strawberry Rhubarb Crumble. It was so effective, I made a second already!

Recipe: Garlic Scape Pesto

Sunday, August 21, 2022

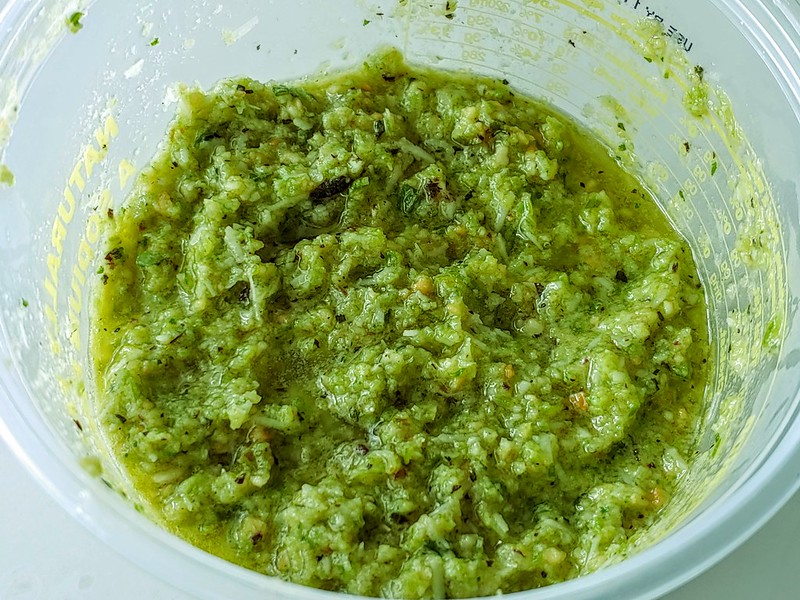
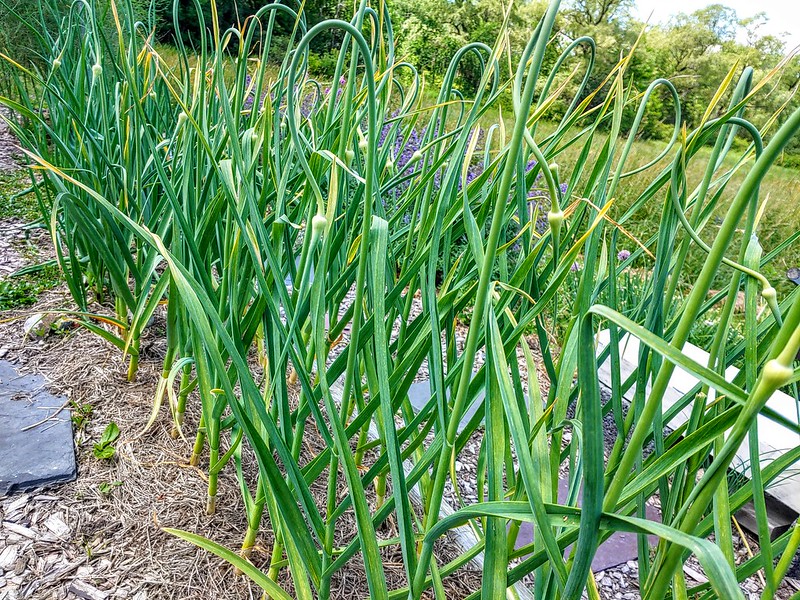
I needed a shareable recipe in a pinch, thankfully, I have a garden! I was able to put together this garlic scape pesto from what I had growing + lying around. You can pretty much make pesto out of anything green (such as carrot tops or parsley!), so that's also a bit handy as well.

Garlic Scape Pesto

Garlic Scape Pesto Recipe

Ingredients:
  • 1/4 cup almonds (or pine nuts)
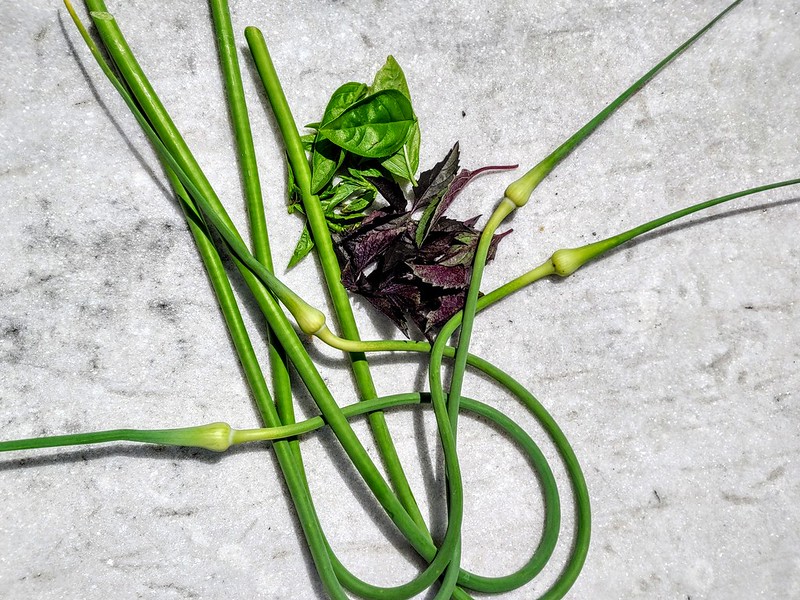
  • 3/4 cup coarsely chopped [garlic scapes*, basil]
  • 1.5 Tbsp lemon juice (or juice and zest of 1/2 lemon)
  • 1/2 tsp salt
  • A few grinds of black pepper
  • 1/2 cup extra-virgin olive oil
  • 1/4 cup grated Parmesan cheese
  • * If you're serving this fresh, you'll want to sautee the garlic scapes first, or use more basil in the mix (50/50). If you're freezing this, you can just use fresh garlic scapes, no need for sauteeing or basil!
  1. Lightly toast the nuts in a dry pan for a couple minutes, let cool.
  2. If sauteeing garlic scapes: sautee in a small amount of olive oil until starting to brown on all sides, let cool
  3. Combine scapes, nuts, lemon juice, salt, and pepper in a food processor.
  4. Pulse ~20 times, until combined, scrape the sides as needed.
  5. Pour in the olive oil through the feed tube while the motor is running.
  6. When the oil is incorporated, transfer the pesto to a bowl and stir in the grated cheese. If freezing the pesto, add the cheese after you've defrosted it.

Garlic Scapes & Basil
Garlic Scapes on Hardneck Garlic
July 4, 2022

Success: Chocolate Coconut Candies

Sunday, August 14, 2022

Homemade Chocolate Coconut Balls

'Made these natural/reduced sugar Chocolate Coconut Balls (Vegan, gluten-free) from Apples for CJ and they're a resounding success. Like a Mounds Bar, but with less added sugar. Next time could try putting an almond in the center for a faux Almond Joy!

Homemade Chocolate Coconut Balls Homemade Chocolate Coconut Balls

The only modification would be...to make more!

Recipe: Chia Seed Pudding

Sunday, July 31, 2022

Chia Seed Pudding and Matcha Chia Seed Pudding

A simple, make-ahead, no cooking mid-morning snack or dessert. Chia seed pudding!

Chia Seed Pudding

1/2 cup almond milk + 2 Tbsp chia seed + a small amount of (optional) honey + a tiny bit of vanilla extract + 1 tsp of matcha (if desired). Mix until no clumps remain, then refridgerate for 2+ hours.
Fruit is defrosted frozen berries, mixed with a bit of honey. Added right before serving.
Chia Seed Pudding Matcha Chia Seed Pudding

Recipe: Violet Simple Syrup

Sunday, July 10, 2022

Making Violet Flower Simple Syrup

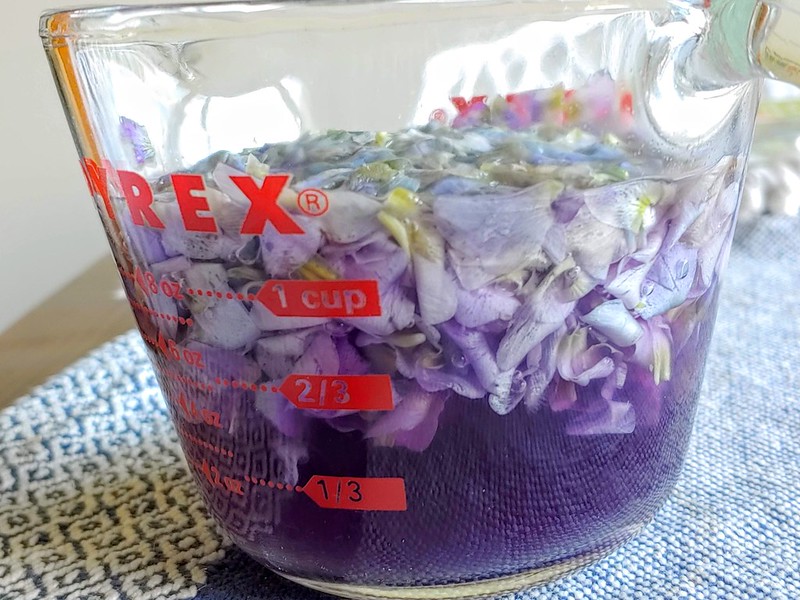
Back in May I foraged a bunch of wild blue violets, soaked them in boiling water overnight and made a multitude of things. Here, it's just the Violet Simple Syrup.

Making Violet Flower Simple Syrup

Instructions are pretty simple. I followed the recipe from SeekingJoyfulSimplicity, but basically you coullect a couple cups of violet flowers (no stems! minimal/no leaves), pour boiling water over just to cover.

Making Violet Flower Simple Syrup

Let steep overnight.

Making Violet Flower Simple Syrup

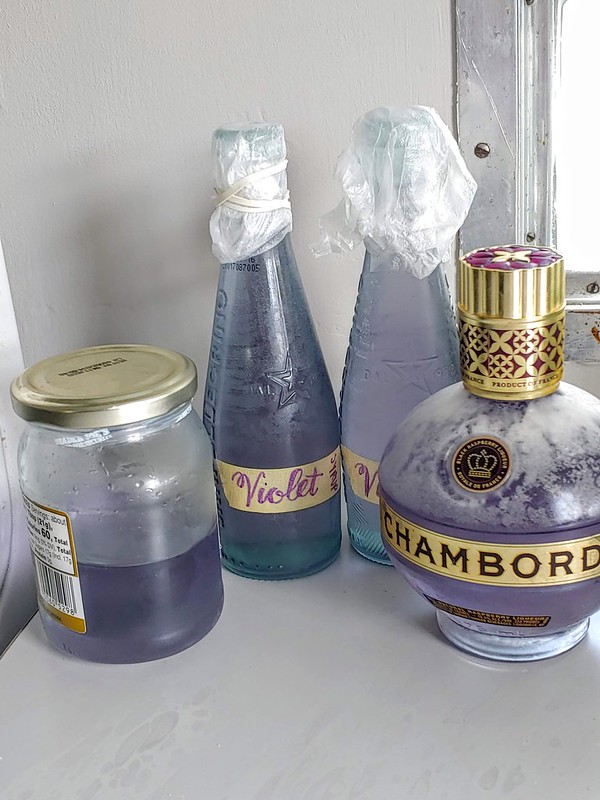
The next day, strain out the flowers and mix 2 parts sugar to 1 part violet tea. Heat in a saucepan over low heat until sugar dissolves (do not boil). Add a couple drops of lemon juice to turn it from cyan to purple! Let cool, bottle, and serve! Will keep in the fridge for ~6 months.

Making Violet Flower Simple Syrup