

Sunday, February 25, 2024
The lastest Sew Liberated Nocturne pajama pattern kick typically references using the "burrito method" to enclose all seams. However, the instructions for this aren't readily available anywhere, I figured it out by adapting another set of instructions. The Sew Liberated Nocturne Top is a double-yoked top that typically has sleeves (although can be adapted to sleeveless with bias binding). If yopu combine this burrito method with French seams and [typical] folded hems, you can enclose all the raw edges of the top. This is great for fabrics that easily fray, increasing sturdiness of garments, and just generally looking nice.
Enlosing all the seams has the side effect, for this top, of making it difficult to tell which way is right side out! The photos of the three tops in this post are all the shirt inside out. It's a very clean finish for a handmade garment.
Step 0: Cut out the two front yoke pieces, two back yoke pieces, and front and back

Step 1: Assemble Front Yoke
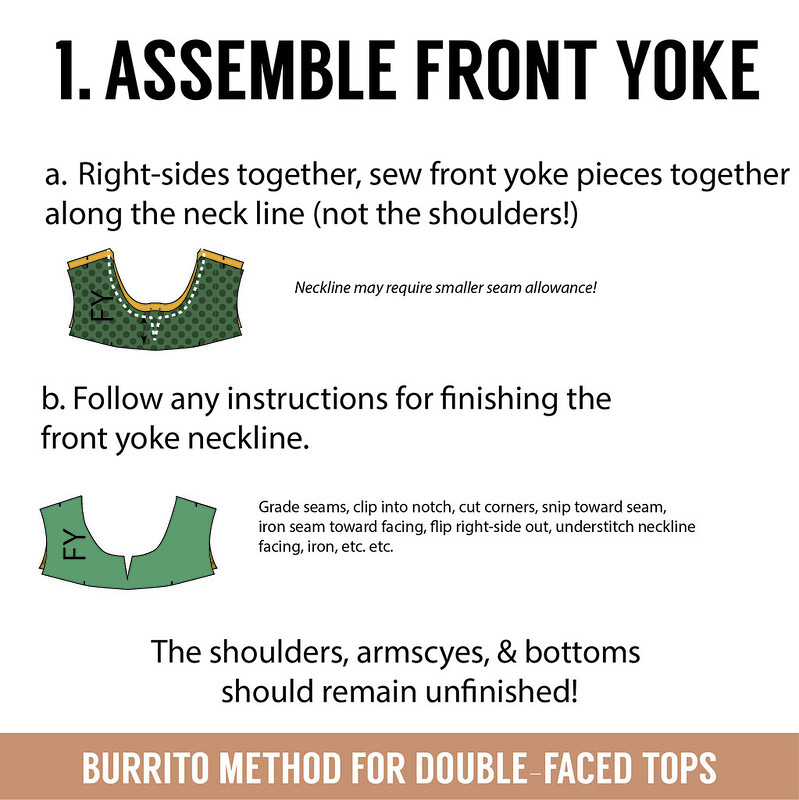
Right-sides together, sew front yoke pieces together along the neck line (not the shoulders!). Neckline may require smaller seam allowance than the shoulders. Follow any instructions for finishing the front yoke neckline. (Grade seams, clip into notch, cut corners, snip toward seam, iron seam toward facing, flip right-side out, understitch neckline facing, iron, etc. etc. ) Step 2: Attach back to yoke pieces

Follow any instructions for fitting the Back to the Back-yoke pieces. (Two sets of basting/gathering stitches along the top, between the notches. Pull threads until top of Back is same width as bottoms of Back-Yoke pieces, distribute gathers, etc. etc.) Right-sides of Back-Yoke pieces facing either side of the Back (upside down), align notches & sew. Grade seams & iron both Back-Yoke pieces upward, so they align at top. Step 3: Baste the yoke shoulders

Letting the Back Yoke Facing fall down/away, place right-side of Front Yoke onto right-side of Back Yoke, aligning the shoulder edges. Baste the shoulder seams at a seam allowance just under the final seam allowance amount. Step 4: Make the burrito

With the Back-Yoke-Facing still down/out of the way, roll the Back piece up from the bottom into a tight “burrito.” Near the top, roll up the Front-Yoke as well. Keep rolling the burrito until the shoulders of the Back-Yoke- Facing are accessible. Wrap the Back-Yoke-Facing around the burrito, aligning its shoulder edges with the previously basted shoulder edges. Step 5: Sew shoulders, neck

Pin the shoulder edges together through all 4 layers of facing fabric, aligning notches as needed. Ensure no burrito gets in the way! Repeat for the neckline. Sew, the shoulders and neckline, ensuring you’re catching only the 4 layers of facing fabric, not burrito! Pivot as you transition from shoulder<->neckline. Neckline may require smaller seam allowance than the shoulders! Grade the inseams, snip around the neckline, and pull the burrito out through one of the armscye. Iron. Step 6: Decide front style

We’re going to attach the Front, sandwiched between the Front-Yokes. We need to decide if we want to stitch-in-the-ditch on the visible side (attach Front to Front-Yoke-Facing first) or have a visible top-stitch across the front (attach Front to Front-Yoke first). Let’s go with a visible top-stitch.
Follow pattern instructions for any gather stitches, pulling to get the Front piece the right width for the Front Yoke pieces. Step 7: Assemble the front

Fold & press the bottom 1/4” of the Front-Yoke, toward the wrong-side. Move the Front-Yoke out of the way. Pin & sew the right-side of the Front-Yoke-Facing to the wrong-side of the Front. Iron. Step 8: Attach front yoke

Flip the Front-Yoke over that most recent seam, aligning its folded edge 1/8” past the seam. Sew and iron into place. Step 9: Finish side seams, hem, sleeves, etc.

Finish side seams and hem as desired/pattern instructs. Add sleeves, etc. etc. Done!


0 comments:
Post a Comment