

Sunday, July 19, 2020
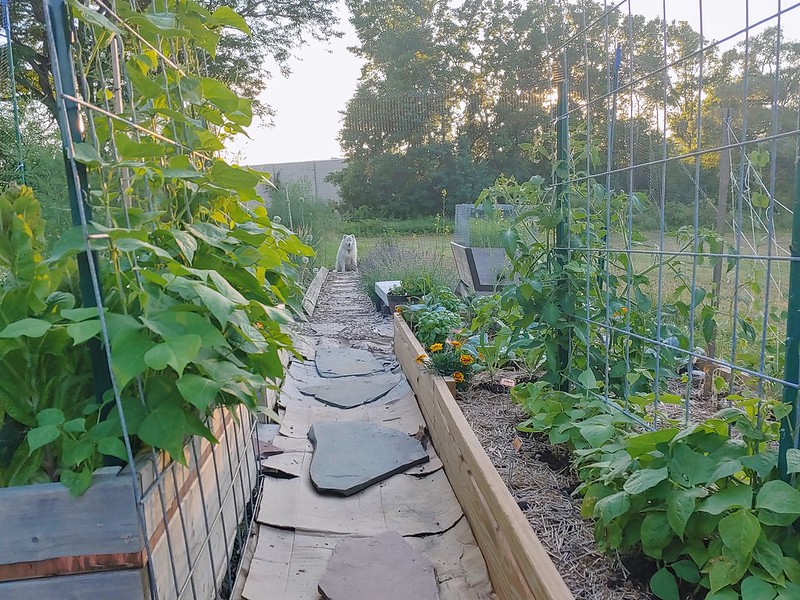
Garden for daaaaaaaaays. This year's big "thing" was to construct an 18' x 4' raised bed in the deer-protected vegetable garden. Just as a reminder, this is what this section looked like in July of last year:

And in April I got a bee in my bonnet to rearrange things, and so we entered the "trash garden" phase of the garden in which I loosened the soil, set-up my garden benches, and moved the cedar cart to the outer garden:
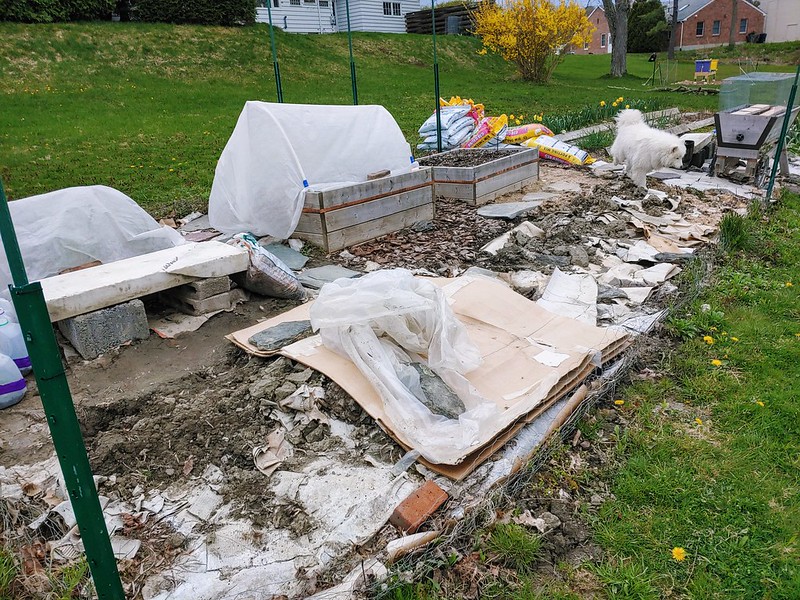
This was not a good look, but I knew we'd be turning all that wasted space into a giant raised bed! For those who don't recall, my garden is located on a sloped lawn. The original owner of the house was an avid gardener and had this nice 40' x 12' plot along the property line. The original owner's daughter then let it go completely to seed/goldenrod for about a decade until I dug it all up last year. The process followed for building the giant 18' long bed was similar to how we built the smaller raised beds but so much trickier, as we had to build it in place. There really is no moving an 18'x4' wood frame! We also used a little sturdier wood, larger corner studs, and included 2 extra supports along the long edge to prevent bowing. Here's a step-by-step, more or less:
- Gather supplies like grass clippings, tree limbs, a million bags of 7 different kinds of soil, etc. (may not include dogs + garter snakes)

- Dig out space for the bed so it will be level. This time, unlike previous beds, I aimed to have the back of the bed flush with the ground rather than sunk in as well. Effort reduction!

May 23, 2020
- Build the raised bed in place. If you don't have boards long enough to span the whole bed (i.e., 18'!), then it's fine to use multiple boards, just make sure the seams aren't shared. This bed is 2 boards high, so we cut 2 12' and 2 6' boards for each long edge, and made sure to interleave them so the seams didn't line up. Both seams on the long edges are reinforced with thinner posts that will be sunk into the ground.


May 24, 2020
- Staple-gun hardware cloth to the bottom of the bed (keeps out critters).

- Dig holes (post-hole digger FTW) at each corner and at the four mid-way support posts along the long edges and then move posts into their holes, sinking raised bed into the ground

- Fill in the bed with dirt so you can walk on hardware cloth without it popping off! Also, fill in gaps around the post-holes.

May 25, 2020
- Layer 1! Native soil.

- Layer 2! Grass clippings.

- Layer 3! Tree limbs.
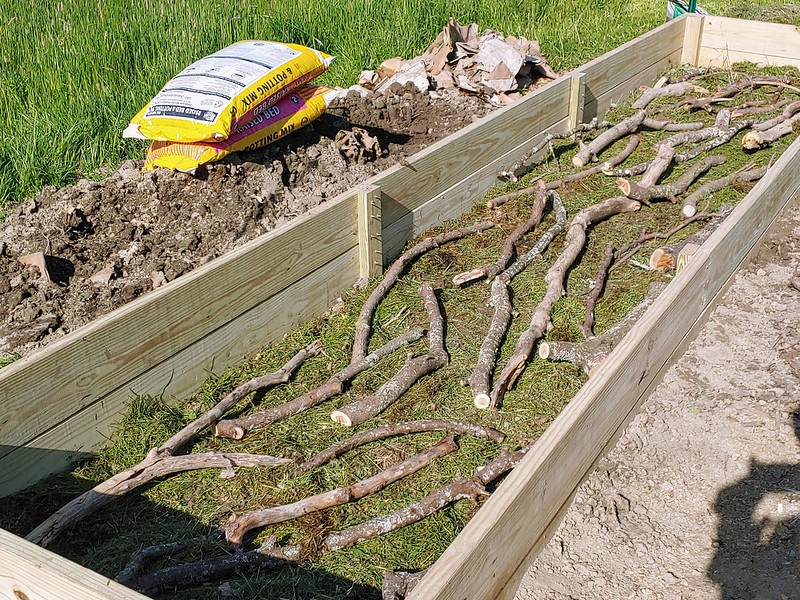
- Layer 4! Grass clippings.

- Layer 5! Old branches.
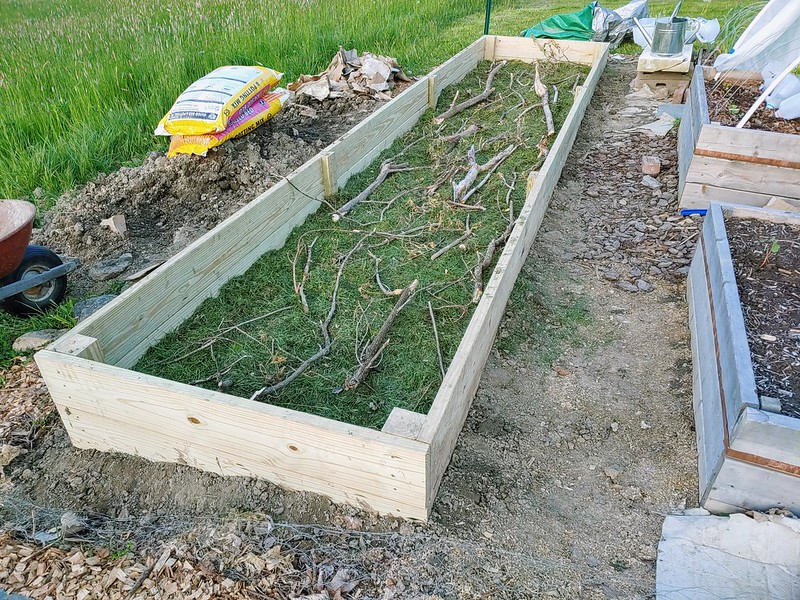
- Layer 6! More grass clippings. Then native soil.

- Repeat: soil, grass, trees, grass until you're close to around 8" of the bed left. And then Layer 7: organic matter (in my case, sawdust and bark chips that had been decaying in my garden pathways for a year).


- Layer 8: a final layer of grass clippings.

May 27, 2020
- Layer 9: Shredded cardboard (will decompose, but also block any weed seeds in grass clippings from germinating).
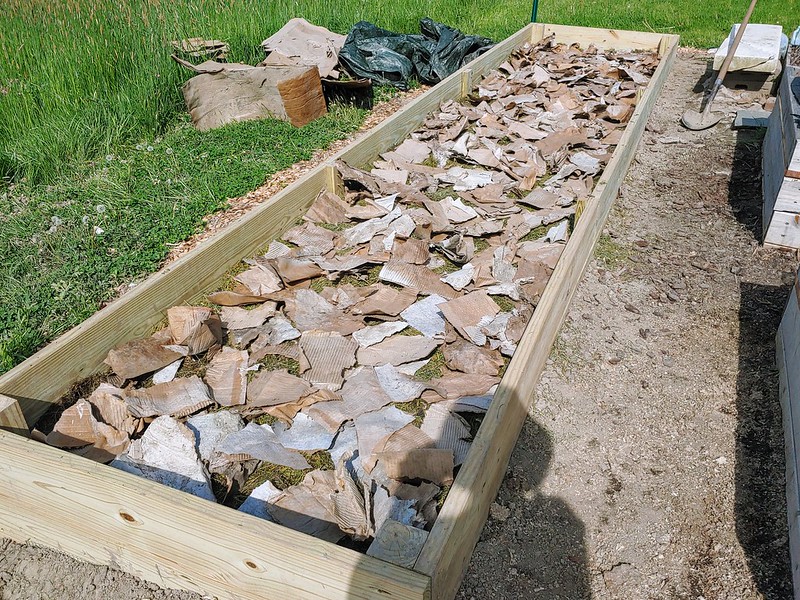
- Dampen cardboard, and now you're ready for the real soils!

- Alternating topsoil, composts, earthworm castings, rasied bed soils, azomite, oyster shells, shredded leavesetc. One type at a time, mixed into under-layers with a garden rake!

- When only a few inches from full, do a final dusting of Azomite minerals

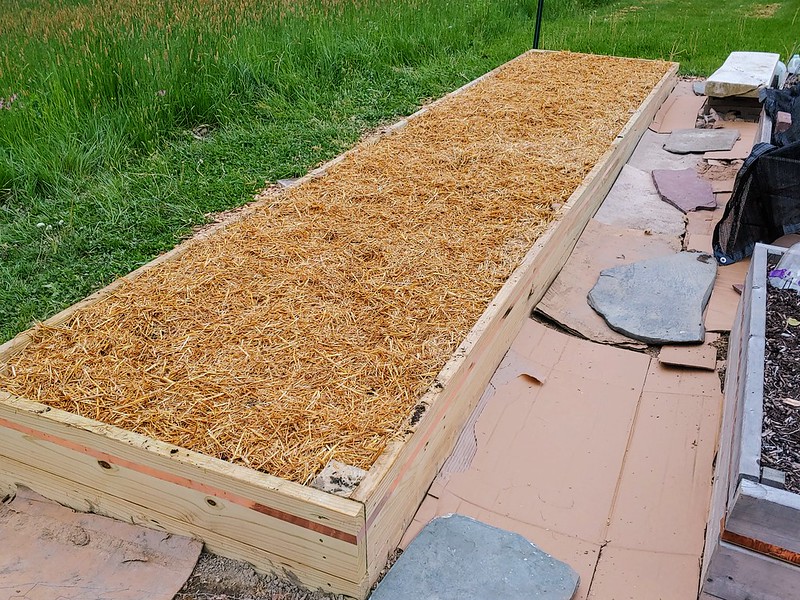
- Final layer of raised bed garden soil:


I generally follow Joe Gardener's perfect soil recipe, although I do a bit of hugelkultur for the bottom of my raised bed to save money, but also in the hopes that the organic matter will break down over time and provide long-lasting nutrients for years of vegetable plants. It is debatable whether this actually occurs, but it's worked fine for me for the past year. Some claim this will cause drainage issues, but I haven't seen any so far.
* It should be noted that we got a really good price on Kellogg's rasied bed and potting soil, like $3/3cu ft. which is wild! So we bought 8 bags and it makes up a good portion of this soil. I really should have included even more manure, because the Kellogg's is essentially bits of wood that are still decaying. As they decay, the microbes in the soil need more nitrogen to continue breaking down the wood bits. And so any bed filled with Kellogg's will have a Nitrogen-deficiency, unless balanced out with high-nitrogen soils (i.e., composted manures). This year I've had to be good about using fish emulsion, homemade seaweed fertilizer, and other natural nitrogen fertilizers to give the plants the nutrients they need. Next year the soil will be *perfectly* decomposed though! - Mulch the top to prevent weeds from germinating. Here I'm using straw we had on hand, but shredded leaves or compost would work, too!
May 28, 2020
- Set-up deer fence. My deer-fence poles are T-posts with 7' tall sturdy stakes zip-tied to them, with some cheapo deer mesh secured via these snap-on plastic clamps which are super handy for securing row fabric to PVC hoop tunnels as well. I also happen to have chicken wire sunk 12" into the ground into a curved [outward] shape to prevent critters from easily digging in. The deer mesh is secured to this chicken wire with small zip ties and also staked to the ground with metal ground staples.
- Install garden infrastructure - like a ton of different trellises. Livestock panel trellis for pole beans, pea trellis with nylon netting, A-frame trellis made from a hog panel for squashes, a teepee trellis for 3 tomato plants.

June 2, 2020
- Now it's time to plant! Kohlrabi, Swiss chard, pak choi, red mustard, marigolds, nasturtium, and basil.

- A day or so later I got around to planting the trellised vegetables. Acorn/butternut/blue hubbard/Long Island cheese pumpkin / Grey Zucchini / Bennings' Tint Patty Pan squashes, 1 lil mama tomato, 3 Purple Cherokee Tomatoes, Cascadia peas, magnolia tendril peas, Kentucky Wonder pole bean, yellow wax bush bean, and painted pony dry [bush] bean.

- It's a good idea to put down mulch in the walkways to prevent weeds. My walkways are quite skinny (2' wide) and so it really doesn't make sense to grow grass as a walkway. For the time being, I'm using cardboard as a weed-block, but I'm in the process of acquiring bark chips (or wood chips) to cover up the cardboard. Both the cardboard and bark chips will break down over time, so repeated applications will be necessary over the years.

July 12, 2020
- A week or so later, everything was still looking good! Even those Macgyvered garden benches (made from marble steps that formerly adddressed our sinking breezeway. Yes, they take up growing space, but I really, really enjoy having a spot to sit in the evening and enjoy the garden.

June 12, 2020
- A few days after all that, I put down some homemade compost to help with nutrient deficiencies. Would've been an even better idea to put the homemade compost near the top layer of soil!

June 15, 2020
- This is around the time when the dog discovered her love of lettuce. She loves running down there and begging for leafy greens (but definitely not kale!)

June 20, 2020
- A little garden update, after some rain:


July 17, 2020
It's a little wild to think that pretty much all of these plants were grown from seed. I suppose I purchased 3 of my 4 basil plants, and I got the marigolds from a local nursery (due to winter sowing failure). I also acquired some pak choi, lil mama tomato plant, and green curly kale from a gardener friend. But most of my money went towards soil instead of seedlings!
And so with this update, we went from:

July 17, 2019
To this:

July 18, 2020


3 comments:
I've probably been reading your blog for 10 years now, and I'm amused that your content again is related to the name of your blog! Vegetables indeed!
Such a amazing article sir thank you for this informative blog....
tarpaulins uk
Post a Comment